DynDNS enables us to great stuff. I use it to reach my home network on the go via a neat subdomain. Sadly, many DynDNS provider call for some kind of fee, at least if you want to use your own domain.
Good thing there is AWS, with its services Route53 and Lambda. AWS-Labs even has the working code in a GitHub repo for us but setting it up with the AWS Web Console can be tedious at best and a nightmare to maintain.
Since they posted that example much has changed in the AWS world. For example, we got the AWS CDK which makes it possible to write infrastructure as code using typescript and npm. Which in turn makes deploying stuff into AWS repeatable and easy.
So, today we are building an extensible, serverless DynDNS for your domain using CDK.
Let’s get started
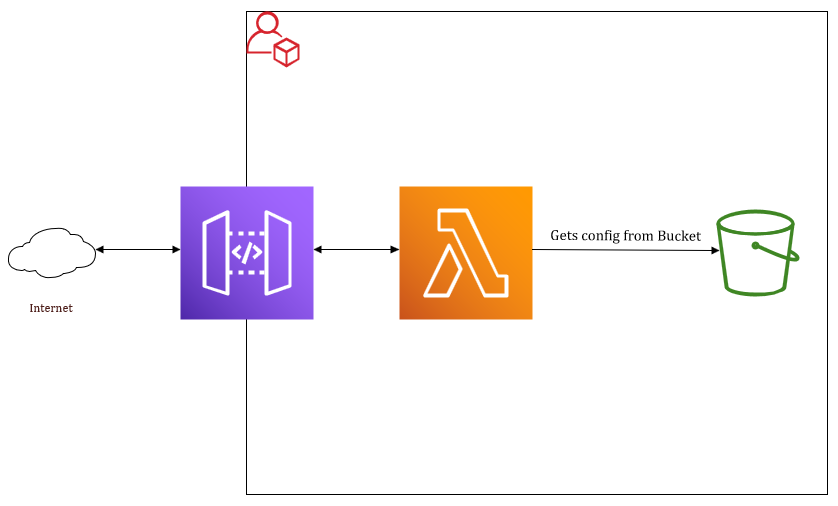
Before we start let us visualize what we are even building.
We will be using AWS ApiGateway as the internet facing component. All requests will go to the APIGateway which in turn redirects it to our Lambda.
The Lambda function will try to access the config file from the bucket and if successful it will do its magic.
How it will work
The DynDNS will be able to manage multiple zones and subdomains, depending on the configuration. For this example however, we are only making it to update one Record in a single Hosted Zone, but configuring it to do more is trivial.
The service will have two modes set and get.
The get-Mode will return the requesters IP as a json and is quite neat for all kind of programmatic applications where you have to get your external IP.
ex. https://dyndns.mydomain.com/?mode=get
The set-Mode will take 2 URL parameters hostname and hash. hostname will contain the record you are trying to update with your new IP and hash will contain, well, a hash from the combined hostname, your external IP and the shared secret.
Since the Lambda will have these values accessible inside the S3 Bucket, it can calculate the same hash we send it, and if so that means our request was “authorized” and the IP can be updated with the requesters.
ex. https://dyndns.mydomain.com/?mode=set&hostname=home.mydomain.com.&hash=d37433e52b3d945eb7cdb63c75154a62f8ebacdf4dc62fe809a341bfbe201c23
Install prerequisites
If not already done you can install CDK as follows:
1
$ npm install -g aws-cdk
We will also need the AWS-CLI configured to use our account. CDK will use the authentication to do all the AWS calls for us.
Use the AWS Docs to install it, depending on your OS:
https://docs.aws.amazon.com/cli/latest/userguide/getting-started-install.htmland run:
1
$ aws configure
follow the guide and everything should be setup.
Clone the repository
For convenience, I created a repo containing all the files we need.
So Only some minor changes have to be done, and we can build and deploy the package.
1 | $ git clone https://github.com/globus243/AWS-DynDNS-CDK.git ./dyndns_lambda |
Edit the source files
We have to change 2 things, the Domain, CDK will use to deploy the DynDNS, and the config file the Service will use during runtime.
On line 18 in
lib/dyndns_lambda-stack.tsenter the name from the hosted zone that should be used to make the service reachable.
So if You plan to use dyndns.mycooldomain.com you already should have a Route53 Hosted Zone called mycooldomain.com.Adjust the setting to fit you:
src/lambda_s3_config/config.json
These setting will be used by the lambda during runtime to generate the hash which will have to match the hash we send on our set-request. Do not forget the trailing dot for the domain name (it is not a typo).
Deploy
When done we can actually deploy our service to AWS. It is done in 4 steps.
Install dependencies
1
$ npm install
Translate files to js
1
$ npm run build
Synthesize a cloudformation template
1
$ cdk synth
deploy it to your AWS Account
1
$ cdk deploy
And Now?
And now we have a working DynDNS service which will update our Route53 Records to the IP requesting the change, if the authorization was successful.
Go ahead and make a get-request to see if it answers:
https://dyndns.mydomain.com/?mode=get
The AWS-Lab Team has also working scripts for updating the record.
I tested this one successfully https://github.com/awslabs/route53-dynamic-dns-with-lambda/blob/master/route53-ddns-client.sh
From here on you could build a Cron job or something to call the script every x minutes to update your record.
I do this from my home automatization server.
Pricing of this solution is extremely low. Only the Hosted Zone will cost a fixed price once a year and as long as you are using it privately, you will probably never hit the free tier limits and even then, it is cents to a million requests. For me, it never made the slightest dent in my bill.