Sometimes you just need a practical scenario to dive into a new tech field. In my case, it was wanting to monitor my cat’s daily routine — when he eats and when he heads to the litter box. It wasn’t just about the curiosity of knowing his routine, but also ensuring he’s eating and doing his business as usual, which is a good indicator of a pet’s health. Also, I had a cheap webcam, I had no use for and, that was perfect for this endeavor which nudged me into the world of motion detection and object recognition, combining them to create basic yet effective pet monitoring.
All code referenced in this post, and more is available in the GitHub repository.
Object detection with YoloV8
Ultralytics, the creators of YOLOv8, made it available in 5 sizes: n, s, m, l, and x. The bigger the model, the more accurate it is, but it also requires more resources.
| Model | size (pixels) | mAPval 50-95 | Speed CPU ONNX (ms) | params (M) | FLOPs (B) |
|---|---|---|---|---|---|
| YOLOv8n | 640 | 37.3 | 80.4 | 3.2 | 8.7 |
| YOLOv8s | 640 | 44.9 | 128.4 | 11.2 | 28.6 |
| YOLOv8m | 640 | 50.2 | 234.7 | 25.9 | 78.9 |
| YOLOv8l | 640 | 52.9 | 375.2 | 43.7 | 165.2 |
| YOLOv8x | 640 | 53.9 | 479.1 | 68.2 | 257.8 |
source: YOLOv8 Readme
Since my finished code will run in a vm on cpu only, because I do not have any ai-accelerators or gpus in my hyper visor, I have to make a tradeoff. I cannot use the x-model, even though its accuracy is fantastic. The n-model allows for a usable frame rate but is too inaccurate for my use case.
The tradeoff will be that I need to train the n-model myself to improve its accuracy for my use case.
How well each model performs on your specific device is easy to check. Take a look at this minimal viable example to detect
objects in a video using yolov8s:
Step 1: install ultralytics, numpy and opencv
open a terminal and run the following command. You can also use a virtual environment if you want to, but at least for ultralytics it makes sense to install it globally, because of its command line interface.
1 | pip install ultralytics numpy opencv-python |
step 2: download the model
The models are available on GitHub. You can download them for free using curl or your browser.
1 | curl -L -o yolov8s.pt https://github.com/ultralytics/assets/releases/download/v0.0.0/yolov8s.pt |
step 3: convert the model to onnx
We are using the *.onnx (pronounced onix) model here. This is a format optimized for even faster inference. You can convert the *.pt model to *.onnx using the following command:
1 | yolo export model=yolov8s.pt format=onnx |
step 4: run the model against a video
Now we can use the model to detect objects in a video. For this, we need a video file. You can use any video file you want. I used a video of my cat eating.
1 | import argparse |
Fine-tuning and training the model
Training Yolo means to create a dataset and use a the yolo train command to start the process. A training set is basically a simple folder structure with JPG-Files and corresponding TXT-Files. The TXT-Files contain the coordinates of the objects in the image. You will also need a yaml file that contains the class names and the directories that contain the training data
Step 1: create the dataset
Let’s start by creating a folder structure for our dataset. We will use the following structure:
1 | -- yolo |
Step 2: creating labels
The labels are simple text files that contain the coordinates of the objects in the image in the format <label_nr> <x_mid> <y_mid> <box_width> <box_height> eg.:
1 | 15 0.8569664001464844 0.34494996070861816 0.08885068893432617 0.40773591995239256 |
Creating these label files is the actual part of training your model; it takes a lot of time and effort. But the effort is worth it, because the more accurate your labels are, the better your model will be. We have basically two options to create these labels: manually or automatically.
Manually creating labels
For some images I was not able to automatically label or where the automatic labeling was not accurate enough, I created the labels manually. I used LabelImg for this. It is a simple tool that allows you to draw bounding boxes around objects in an image and save the coordinates to file. It is available for Windows, Linux and Mac. Its also rather quick to work with when using the shortcut keys.
Automatically creating labels
Since we just want to improve the accuracy of the smaller n-model, we can use the x-model to automatically label the images. This is not as accurate as manually labeling the images, but it is a good starting point.
To start, I created a 5-minute video which always contains my cat in various locations in the scene. Running that video through the n-model, I collected all the images where the model was unable to detect a cat. I then ran these images through the x-model and used the resulting labels as a starting point for my manual labeling. Using an M1 Macbook, I was able to lable most of the ~7000 frames in about 1 hour.
For some frames, even the x-model was unable to detect the cat. Also, the x-model, in a few cases, drew the bounding boxes too big so that they included parts of the background. I manually corrected these labels.
You can find the code for both of these steps in the GitHub repository for this blog post:
- detection_check.py: collects all frames where yolov8n was not able to detect a cat.
- x_check.py: runs the frames from detection_check.py through yolov8x and saves the labels to file, creating a dataset in the process.
Step 3: create the training.yaml
This is just a simple config file for the training process. Assuming your folder structure is like the one from step 1, it should look something like this:
1 | path: ./dataset |
see the coco128.yaml file for a complete list of all classes.
Step 4: start the training
Finally, we can start the training process. After all the preparation, this is as simple as running the following command:
1 | yolo detect train data=training.yaml model=yolov8n.pt epochs=2 |
Explanation of the parameters:
data: the path to the training.yaml filemodel: the model to use for trainingepochs: the number of epochs to train for, epochs are basically iterations over the entire dataset. The more epochs you train for, the more accurate your model will be. But training for too many epochs can lead to overfitting, which means that the model is too accurate for the training data and will not be able to generalize to new data. Common wisdom is to train for as many epochs as you can without overfitting. In my case, I trained for 10 epochs, which took about 12 hours on my M1 Macbook.
In the end, I used a more complex command to make use of the “hyperparameters”, which resulted in a much more confident model. This is the command I used:
1 | yolo detect train data=training.yaml model=yolov8n.pt epochs=10 lr0=0.00269 lrf=0.00288 momentum=0.73375 weight_decay=0.00015 warmup_epochs=1.22935 warmup_momentum=0.1525 box=18.27875 cls=1.32899 dfl=0.56016 hsv_h=0.01148 hsv_s=0.53554 hsv_v=0.13636 degrees=0.0 translate=0.12431 scale=0.07643 shear=0.0 perspective=0.0 flipud=0.0 fliplr=0.08631 mosaic=0.42551 mixup=0.0 copy_paste=0.0 |
Making use of the model
Now that we have a trained model, we can use it to detect objects in images and videos. The code for this is very similar to the code we used to create the training data. You will just need to exchange the label-writing part with whatever you want to do with the detection.
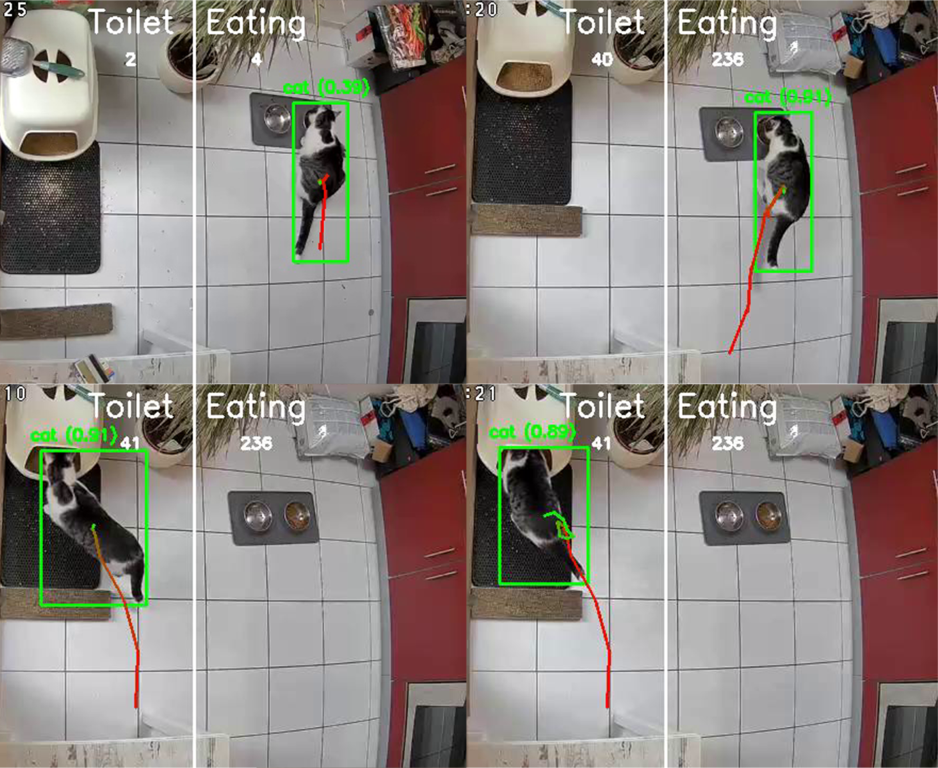
In my case, I monitored an RTSP stream from my webcam using OpenCV. And each time my cat is detected, we make an entry into the database so it can we display as a Gantt-Diagram. Because the ai-model is quite cpu intensive, I also implemented motion detection to only run the model when there is motion in the scene. This is the code I used:
1 | # OpenCV offers a background subtractor that can be used to detect motion in a scene. Depending on the history-size, |
full example in monitoring.py
Conclusion
Machine learning is extremely powerful and fascinating, but the surrounding math makes it intimidating and unapproachable for the uninitiated. Though, with the right tools, it is easy to get started and create something useful. I hope this blog post was helpful to you, and you will be able to create something with it. If you have any questions, feel free to reach out to me on LinkedIn or GitHub.